
Mad Props to Ken's Falco Page!

| |
Todd's ETV 1000 Caponord Page Mad Props to Ken's Falco Page! |
|
This is some great information that Stu_O on the ApriliaForum forum shared with me about the OEM fuel line and quick disconnects--thanks, Stu_O!
First, this is probably going to bore most of you. Don't let me waste your time if you're not interested; use your back button.Secondly, high-pressure gasoline is nothing to be complacent or incompetent with. Don't do anything I did unless you know what you're doing. Once again, this material is FYI only; not a recommendation.

Okay, with the disclaimers out of the way, here's what I did on the fuel delivery line and why I did it. Note the picture of the OEM fuel line. It's a thin-walled Teflon tube with steel braid over it for abrasion protection. This type line becomes badly and permanently deformed when bent into a tight radius. Simply lifting the fuel tank had kinked mine where it attached to the engine's pressure inlet fitting. I obtained the new replacement line pictured but could find nobody capable of swaging the fittings on. Good thing, as it turned out, because the barb (if you can call it that) on the engine-end fitting barely grips the inside of the hose. I'm convinced that only a duplicate of the factory crimp would have been safe.

The OEM barb, pictured alongside the reworked pressure fitting, was cut off with a Dremel tool. The replacement brass barb is part of an inexpensive air line repair kit available at NAPA stores. The NAPA part number is 90-550. It was drilled from the round end to a depth of 6mm using a 17/64 drill. The remaining shaft of the pressure fitting was then deburred and polished with Scotch Brite to remove the cadmium plating. The shaft itself is brass, but it's nickel-plated, then cadmium-plated.
Finally, the shaft of the pressure fitting was inserted into the new brass barb and soldered in place. This is the critical step. The parts must be joined as one would join copper household plumbing. Sweat plenty of solder into the joint using adequate heat, and allow it to cool naturally, not by running cool water over it. Clean any solder globs or flux residue from inside the fitting when you're finished. You should now have a new part capable of withstanding hammer blows without failing. Naturally, this new part must be tested for leakage. I used a vacuum pump/gauge combo. But at a minimum, start the engine and observe for leakage after installation and before lowering the tank into place.

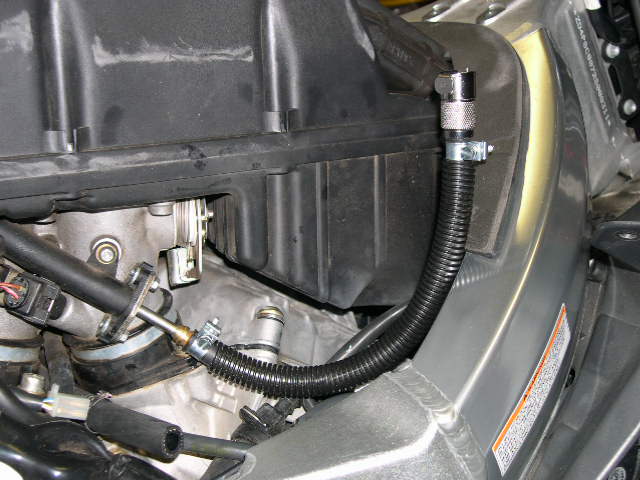
You'll now be able to install rubber, high-pressure automotive fuel injection hose with a metal clamp to secure it. Note: use only ¼" hose clamps specifically designed for fuel injection. These are available at NAPA and many other auto parts stores. They employ a clamp screw rather than a worm drive, and their edges are rolled to avoid cutting into the hose. The hose came from NAPA and performs to SAE 30R9 (printed on the hose). This assures pressure resistance up to 180 psi. Cut the hose to the same length as the original. Also note the use of plastic wiring loom to protect from abrasion. The hose assembly pictured has the new metal Colder Products coupler installed on it.
Here are Colder part numbers to replace the OEM disconnects. They're all chrome-plated brass. These coupler bodies do not have a shrouded latch lever like OEM. Otherwise, they're identical to the OEM pieces in form, fit, and function. If I have any fears about accidental unlocking due to lack of a shroud, I'll secure a cable tie around the fitting with the catch positioned under the fitting's latch lever.
1/4" barbed coupler bodies - Colder part# LCD17004 - two required. $15.11 ea.
1/4 NPT male fuel pump fitting - Colder part# LCD24004. $9.60
3/8" barbed unvalved return line male fitting - Colder part# LC22006 - $4.30When inserting the barbs of the new coupler and your reworked fitting into the hose, make sure the clamps are already on the hose, because you won't be able to remove the fittings after insertion without cutting them off…even without the clamps tightened. Position the clamps so that about 2mm of hose protrudes towards the fitting, and tighten them until the protruding end of the hose swells very slightly. Do not attempt to tighten the clamps until their ends meet; mine have about 4mm between the ends.
That's about it. Hook everything back up. But once again, I strongly urge the reader to check for even the slightest seepage with the engine running before calling it "good to go."
If replacing the machine's three other plastic fuel fittings with metal Colder pieces, simply insert the barbed ends into their respective hoses and replace the clamps. The ¼ NPT fitting on the tank should have a couple wraps of Teflon tape applied to its threads. DO NOT apply liquid pipe thread sealant to that fitting.
| Feel free to contact me: todd at caporider dot com | You can always go home again |